Learning Objectives
After this you will be able to;
- Explain how the job workflow settings effect the job statues and capabilities deskless workers have
- Configure work offer capabilities to help streamline the allocation process
- Configure the various workflow settings to meet a range of business use cases
Understanding workflow settings
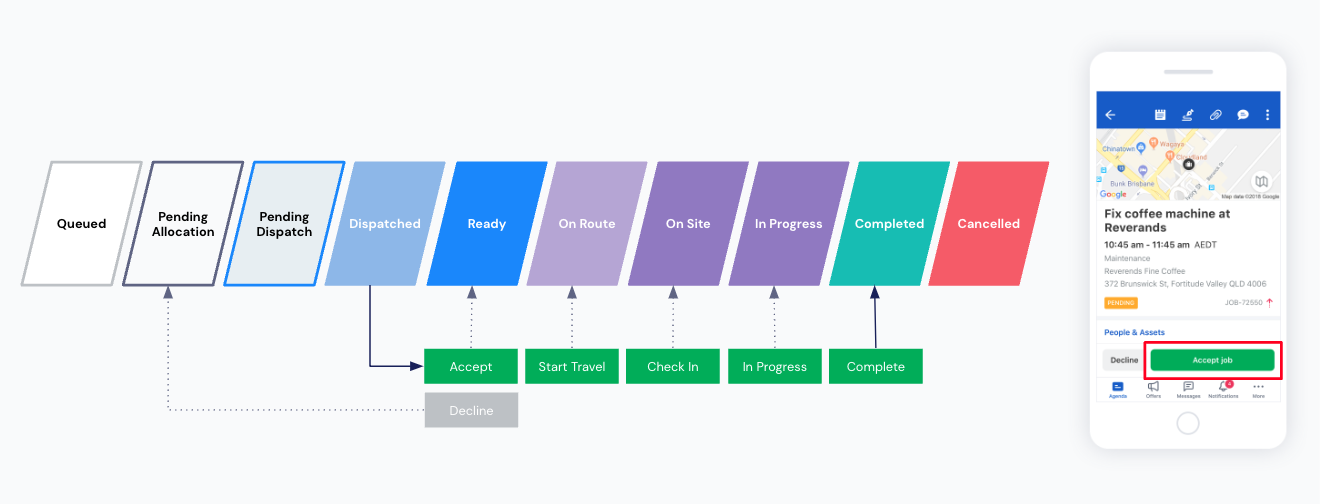
The job workflow represents the various status that work goes through, starting from the creation of work phase all the way to work completion. The workflow settings relate to processes and flows that impact the Web App and the Mobile App. There are a number of settings available, however in this lesson we are going to only focus on the settings that directly relate to the flows that work goes through.
Recapping the statuses and what they represent
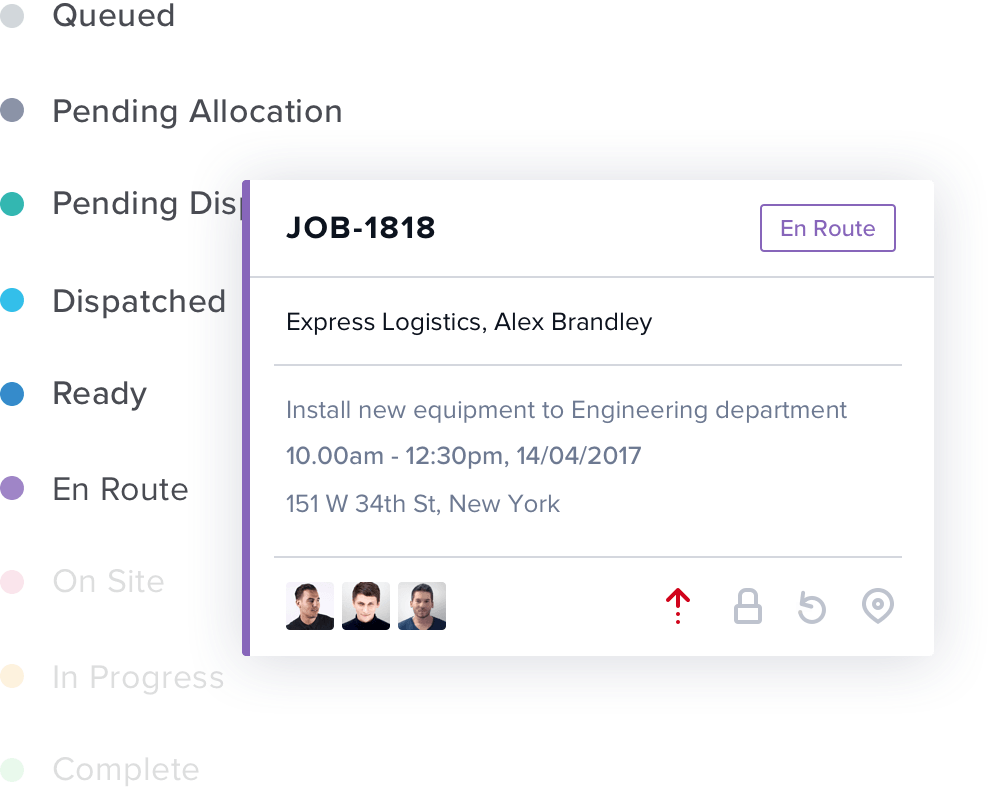
Job status indicators are used to provide a visual indication of the jobs progression. The job status is automatically updated based on milestones, for instance on creation, scheduling, acceptance, commencement, and completion of a job. They are also related to the job’s allocation status.
When a resource is allocated to a job, a job allocation record is created. The Skedulo web app tracks the status of each job allocation record to determine the job status.
| Job Status | Description | Job Allocation Status |
|---|---|---|
| Queued | The job has been created but no date/time has been set, and no resource(s) have been allocated yet. | N/A |
| Pending Allocation | The job has a date and time, but no resource(s) have been allocated yet. | N/A(Declined) |
| Pending Dispatch | The job has been allocated and is ready to be dispatched to the allocated resource(s). | Pending Dispatch |
| Dispatched | A job notification has been sent to the resource(s) and is located on the notifications view of the resource(s) mobile app. | Dispatched |
| Ready | All allocated resources have accepted the job using the “Accept Job” button in the mobile app, or have replied to the received SMS notification with “Yes…”. | Confirmed |
| En Route | All allocated resources have started traveling to the job. This is triggered by tapping the button labeled “Start Travel” (by default) on the mobile app. | En Route |
| On-Site | All allocated resources have arrived at the job site. This is triggered by tapping the button labeled “Check In” (by default) on the mobile app. | Checked In |
| In Progress | All allocated resources have started the job. This is triggered by tapping the button labeled “In Progress” (by default) in the mobile app. | In Progress |
| Complete | All allocated resources have completed the job. This is triggered by tapping the button labeled (by default) “Complete” in the mobile app. | Complete |
| Cancelled | This status is used to identify jobs that have been canceled by either the scheduler or resource. | Cancelled /Deleted |
Job statuses and configuring action labels
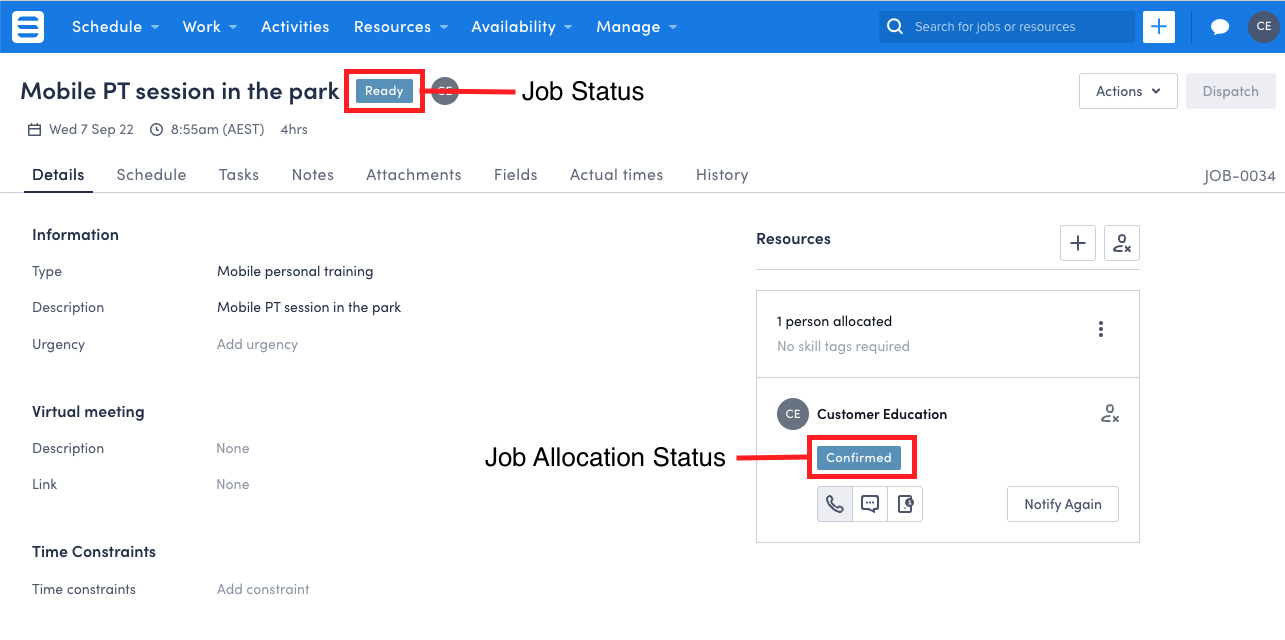
As you just saw in the table above, Skedulo has two different categories for the statues against a job. One represents the job status and the other represents the resource status against the job allocation record. These statues are made visible to schedulers inside the Web App that are updated in real time showing where the job is at within the workflow.
When looking at things from a deskless workers perspective, action buttons are clicked to move the job from the current status into a new status. When a deskless worker clicks these action buttons, the status of the job and job allocation records will be updated inside the web app.
Action button labels can be changed to a new string, allowing for a more contextualised experience. For example, the ‘In Progress’ status represents the actual time the resource started work and the ‘Complete’ status represents the actual end time of the job. To make this a little more clear, you could change the ‘In Progress’ status to ‘Start Service’ and the ‘Complete’ status to ‘End Service’.
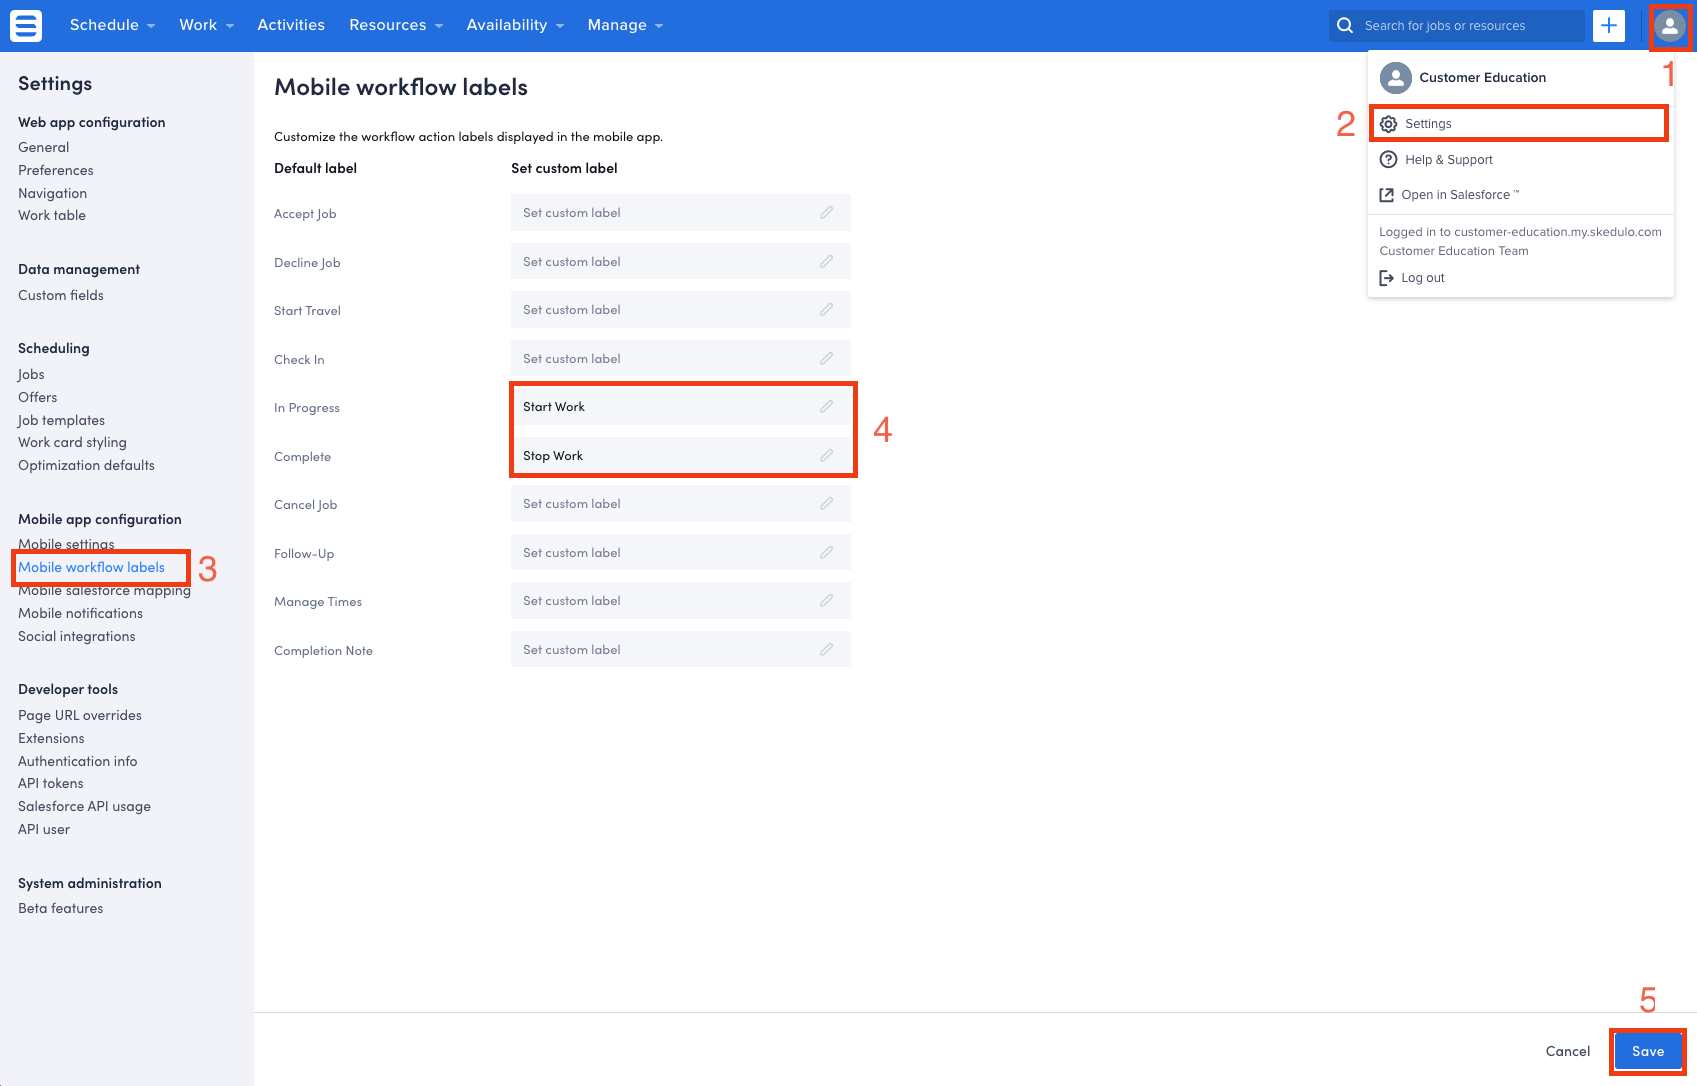
Changing workflow action labels
If your organisation wants to change these labels, you can;
- Click on your profile picture in the top right corner
- Choose the ‘Settings’ option in the dropdown list
- Navigate to the ‘Mobile Workflow Labels’ settings screen
- Double click the label you wish to change and write your new phrases
- Click save at the bottom of the page
Changing job and job allocation statuses
Only the action labels can be changed with the web app settings. Skedulo does not offer the ability to change job or job allocation statues. If you have administrator access to change the job and job allocation status values against the data-model, it is strongly advised you do not change or amend them in any way.
Setting a team leader against jobs
Skedulo offers a team leader feature allowing one of your allocated resources against the job to process the statues on behalf of all the other allocated resources. This relieves the other resources from the responsibility of updating the job status, allowing them to concentrate on other tasks.
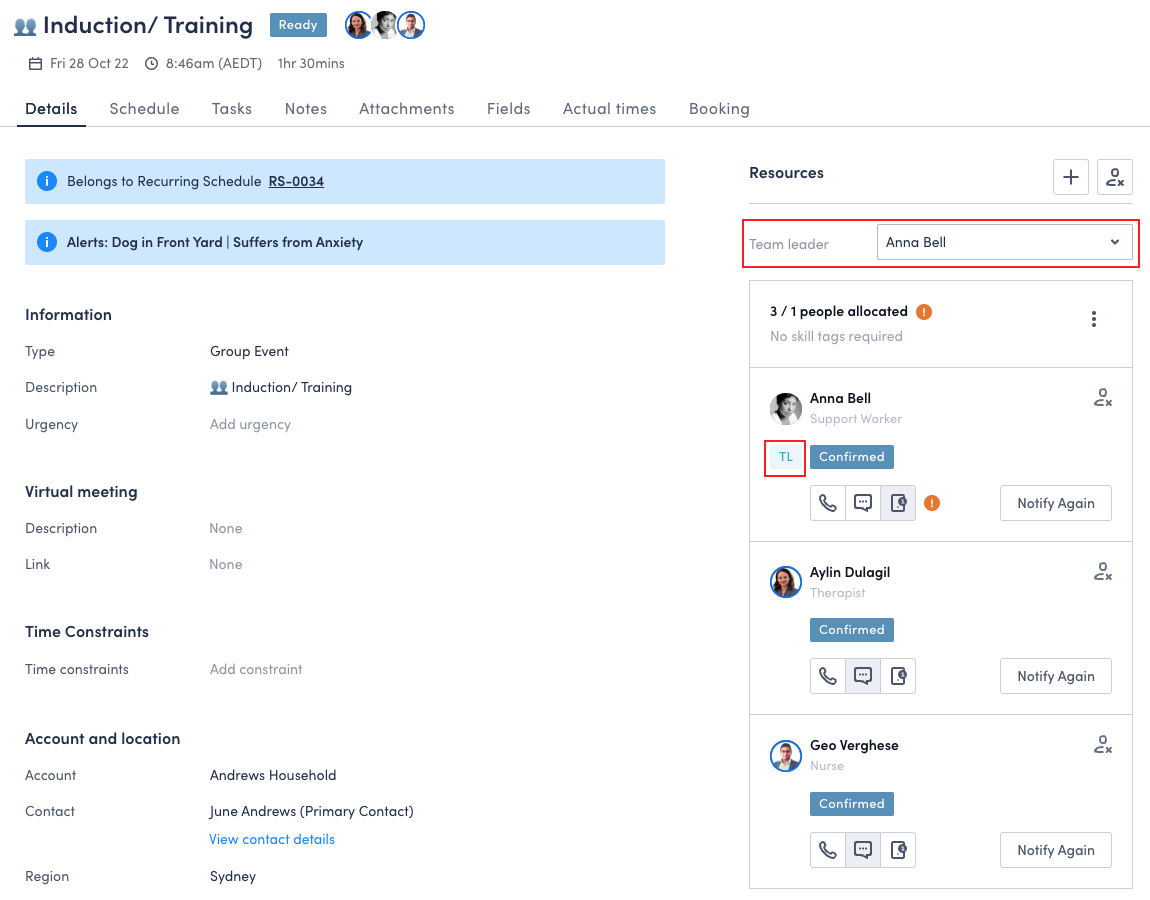
This capability can be activated inside the web app settings. When enabled, schedulers will have the optional ability to nominate a team leader against a job. The team leader’s status changes and associated time records will apply to all resources allocated to that job. For example, when the team leader changes the job status on their mobile device to ‘In Progress’, the job status and the status of the other allocated resources is also updated to ‘In Progress’. Similarly, if a resource changes their status to ‘Complete’ when the team leader’s is still ‘In Progress’, then the status of the job will remain ‘In Progress’.
If there is no team leader assigned on a job with multiple resources, the job status will only be marked as completed when all resources have updated the job to the completed status inside the mobile app.
It is important to note that when the team leader capability is activated, this does not auto apply to all jobs but instead your schedulers will have the option to assign a team leader on a job by job basis.
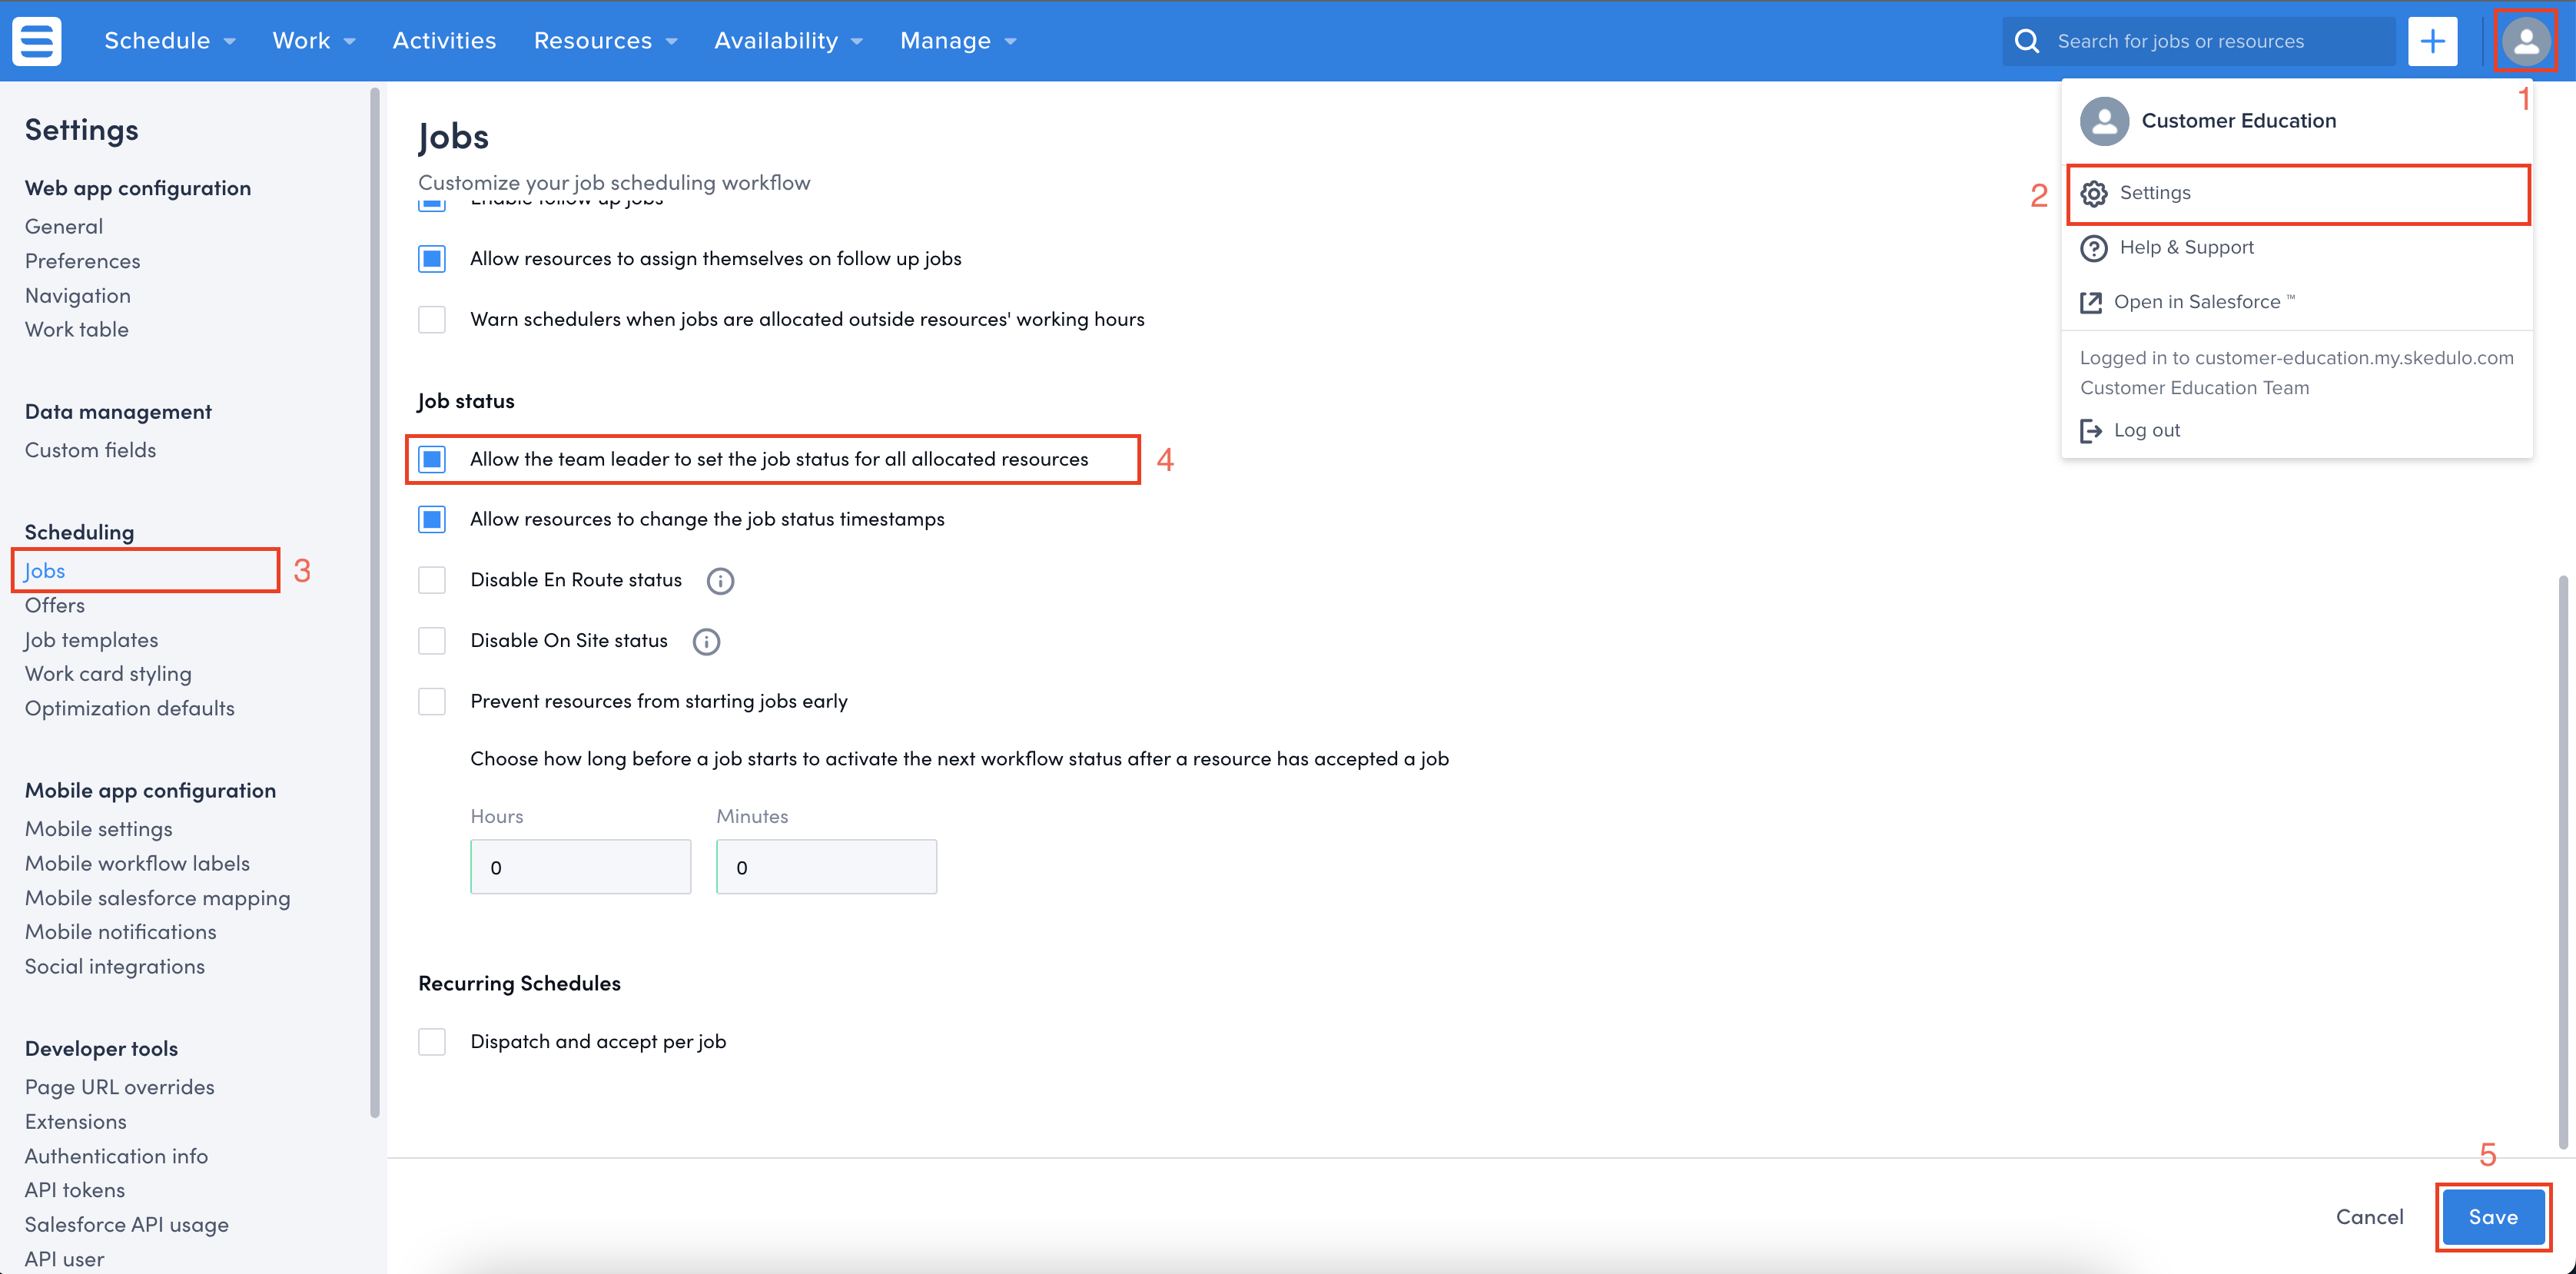
Activating the team leader capability
If your organisation wants to allow jobs to have a team leader;
- Click on your profile picture in the top right corner
- Choose the ‘Settings’ option in the dropdown list
- Navigate to the ‘Jobs’ settings screen
- Look for the setting ‘Allow the team leader to set the job status for all allocated resources’ and set it to True
- Go to bottom of the screen and click save
Configure work offer settings
Work offers are a very popular feature when it comes to quickly offering work out to multiple people. Not sure who should be allocated to the work? Just send out a work offer to multiple resources giving them the option to accept or decline. Work offers are a nifty little capability and if you would like to learn more about how they work, you can check out the lesson ‘Allocation, suggest and optimise‘.
Worker offers complement the workflow by bypassing the standard allocation and dispatch process. When job is in the ‘Pending Allocation’ status, a scheduler can send out a work offer to multiple workers. When the work offer has been approved and assigned, the job will be taken straight to the ‘Ready’ status.
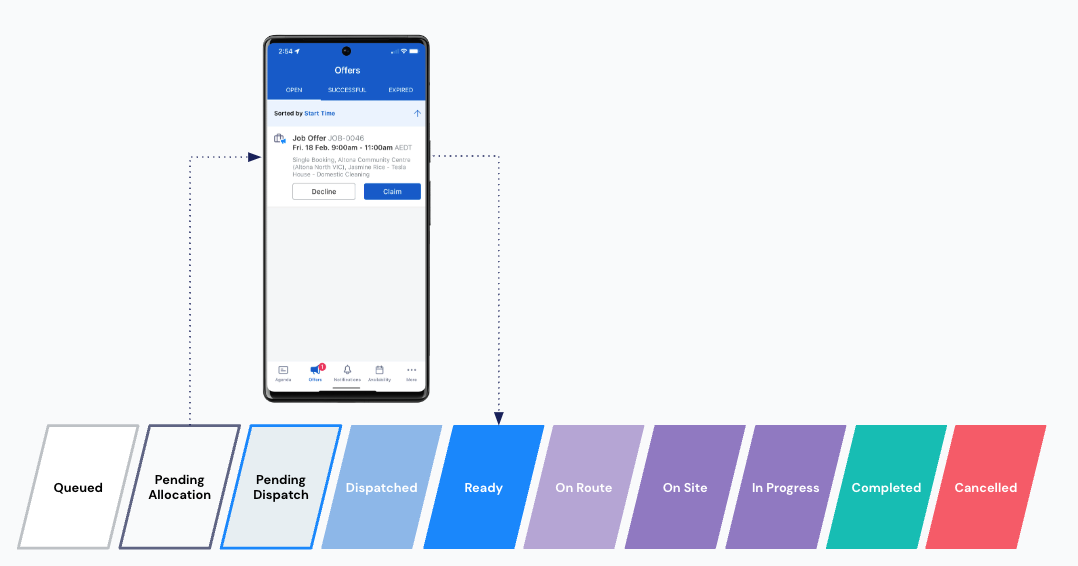
When a work offer is sent out to deskless workers, you have two choices as to how the job is approved and assigned, moving it into the ready status.
Option #1 – Auto allocate
- Auto allocate simply put, is first in first serve.
- When an offer is sent out to a group of resources, whoever accepts the offer first will be automatically allocated to the job.
- If you select the setting ‘Notify resources when an offer is no longer available’ all the other resources who missed the offer will be notified.
- Auto allocate is a global setting and will apply to all shifts or jobs that are offered across the organisation.
Option #2 – Scheduler controls allocations
- When the scheduler controls the allocation, each worker will respond with either accept of decline. These response are recorded against the offers on the job and when there are enough responses the scheduler can allocate the work to resources who excepted the offer
- If you select the setting ‘Notify resources when an offer is no longer available’ all the other resources who missed the offer will be notified.
- Schedulers can apply filters within various consoles to show jobs that have had responses to offers sent out and where resources have accepted.
- Scheduler controls allocation is a global setting and will apply to all shifts or jobs that are offered across the organisation.
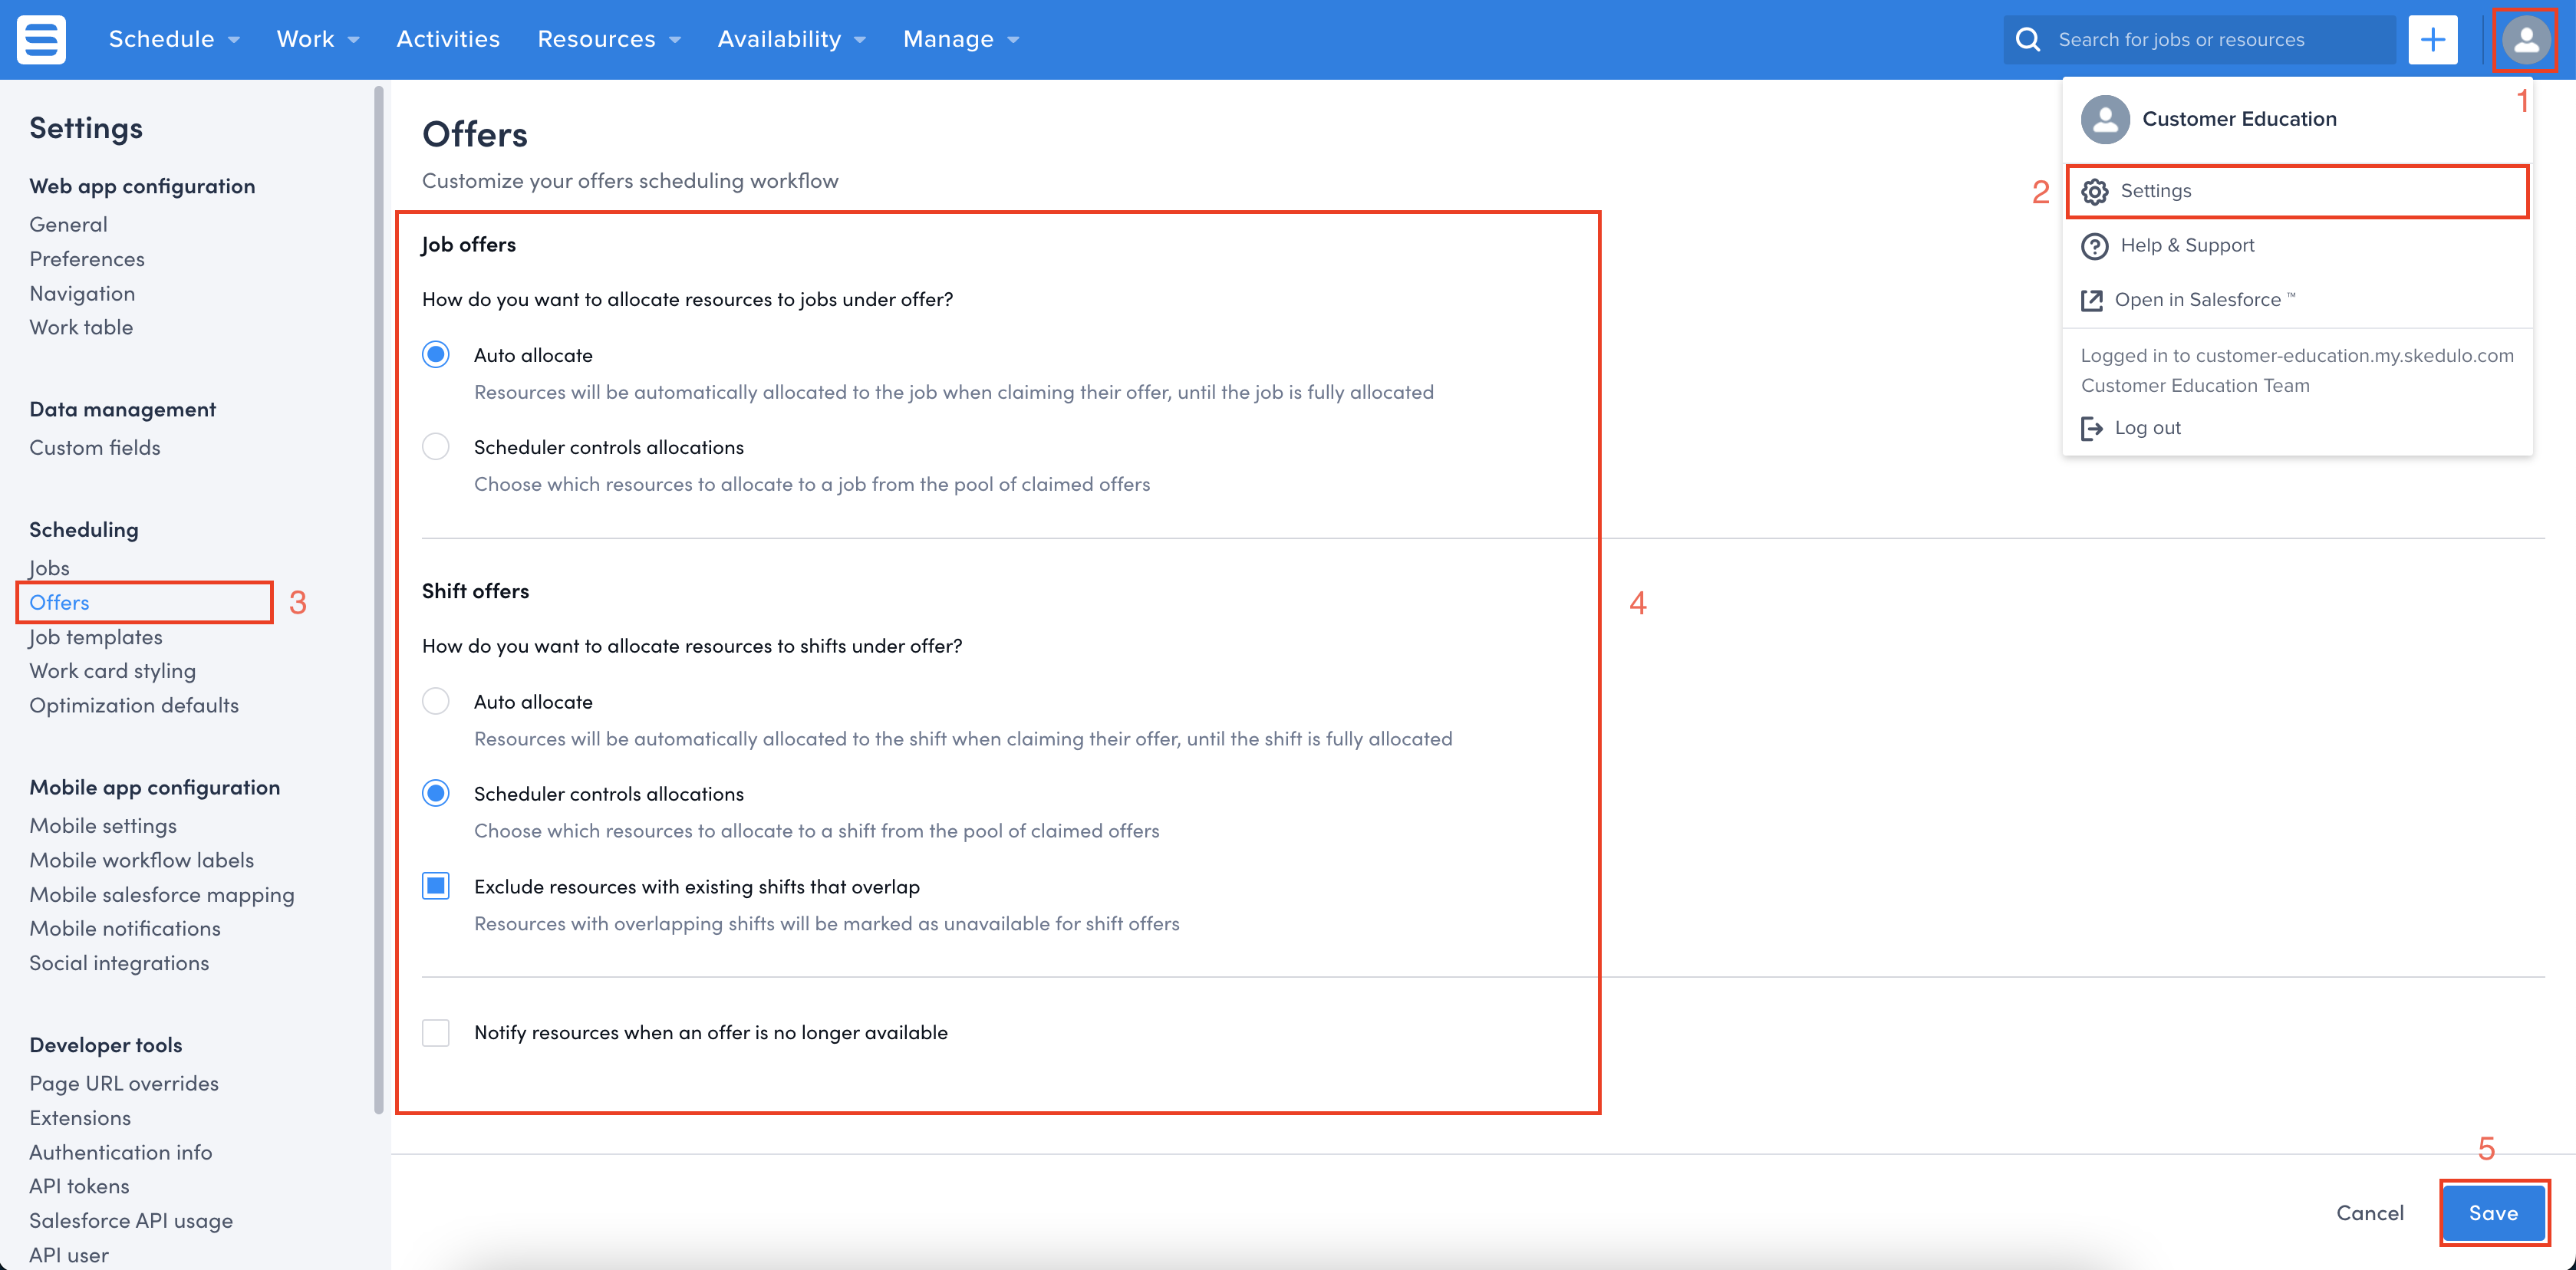
Changing offer settings
- Click on your profile picture in the top right corner
- Choose the ‘Settings’ option in the dropdown list
- Navigate to the ‘offers’ settings screen
- Make the changes to meet your business needs
- Go to bottom of the screen and click save
Configure the job workflow
At the start of this lesson we recapped the job statuses and what they represent. We have already explored some settings that enable and support the job workflow but we have not directly changed the workflow. In this next section we are going to break down the job workflow in more detail and provide some example configuration options.
The job workflow settings are found in the Web App settings screen;
- Log into the Skedulo Web App
- Click on your profile picture in the top right corner of the page
- Click on the settings tab
- On the lefthand side, click on the menu item ‘Jobs’
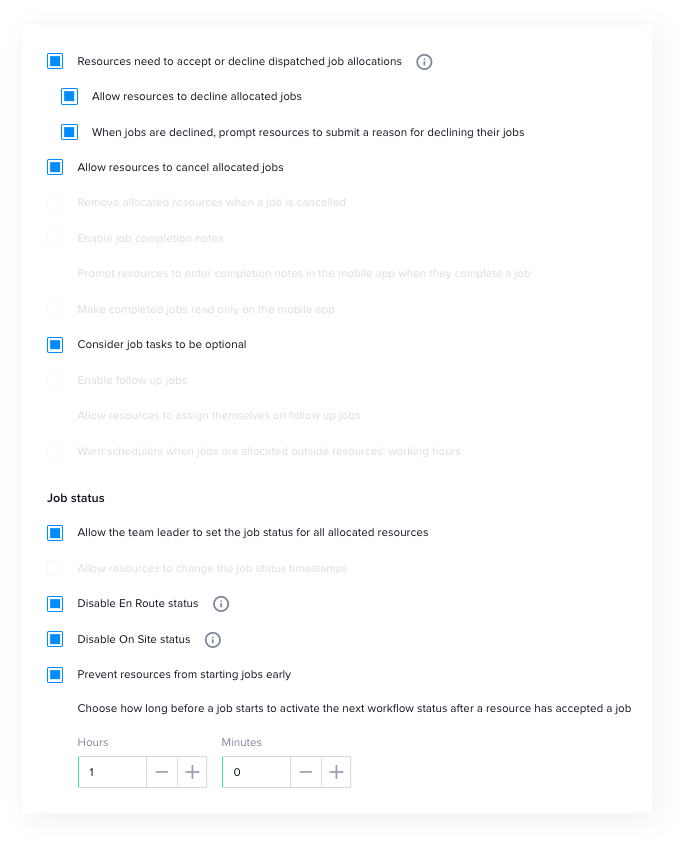
The image below highlights the settings we will be discussing in this lesson. Non-highlighted settings will be discussed in other material, as they can impact some business processes and extensions. If you would like to learn about all the settings available to you in the job screen, you can read the Admin Settings: Workflow article in our knowledge base.
Exploring configuration examples for the job workflow
Let’s be honest, you know your business best. Skedulo can be configured to meet a range of use cases and it will take too much time to cover them all here and ain’t nobody got time for that. The best way to understand how the job workflow can meet your business needs is by jumping in and playing around, but remember it’s not wise to do it when your system is live. So let’s dive into three examples on some configuration options.
Example #1 – Full workflow with deskless worker autonomy
Some customers like to give complete autonomy to their deskless workers, allowing them to control various outcomes for work being conducted in the field. The following configuration example opens up all job statuses in the workflow while also allowing deskless workers to move work into other statuses, outside the linear job workflow statuses. In this scenario, we encourage customers to focus on reporting and analytics to be able to see what is happening out in the field, as deskless workers go about their business.
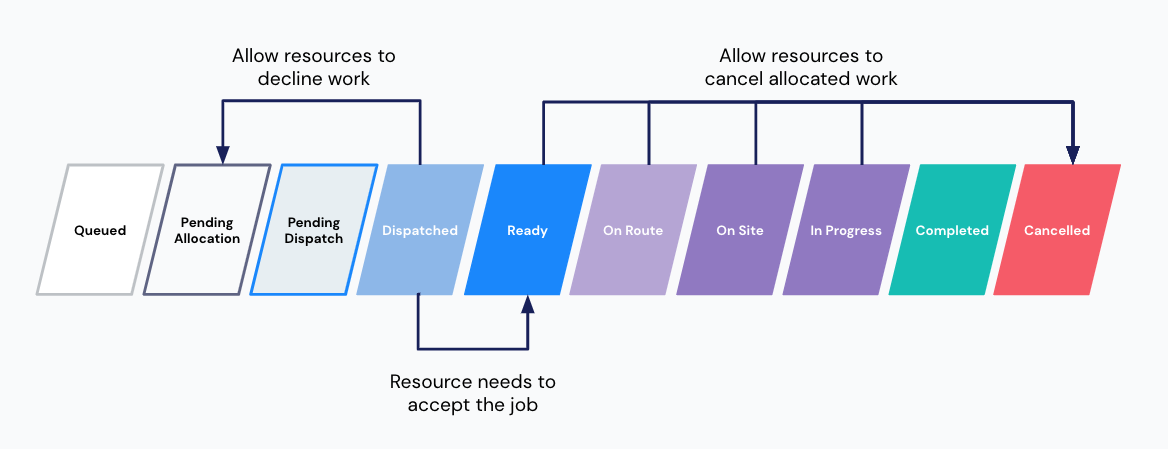
- Jobs can be cancelled at any status, unless it is completed, via the mobile app.
- When a job is dispatched, a deskless worker can click the ‘Decline Job’ button sending it back to pending allocation, or the ‘Accept Job’ button to move it into the ‘Ready’ status.
- If a resource declines a job, they will be prompted to give a reason as to why.
- Deskless workers can start a job at anytime. Yes, they could technically start it days either side of the scheduled date.
- Deskless workers check through all statuses of the job workflow, updating the schedulers in real time.
- Deskless workers do not need to complete the tasks outlined by schedulers before completing the job, allowing them to perform work they feel is most suitable.
To test this example, configure the workflow settings to match the items listed below;
| On | Resources need to accept or decline dispatched job allocations |
| On | Allow resources to decline allocated jobs |
| On | When jobs are declined, prompt resources to submit a reason for declining the jobs |
| On | Allow resources to cancel allocated jobs |
| On | Consider tasks to be optional |
| Off | Disable En Route status |
| Off | Disable On Site status |
| Off | Prevent resources from starting jobs early |
If you want to enable even more autonomy for your deskless workers, you could explore the option ‘Enable follow up jobs‘ and ‘Allow resources to assign themselves on follow up jobs‘.
Example #2 – Refined workflow with control
For some organisations, work is structured with deskless workers required to perform what was outlined by the scheduling team. The example below leverages the workflow statuses to provide real time tracking but with control gates added to ensure the deskless worker is always meeting the customers needs outlined on the job. In this scenario, we encourage customers to explore business processes and other Skedulo capabilities to communicate collaboratively if any exceptions are to occur.
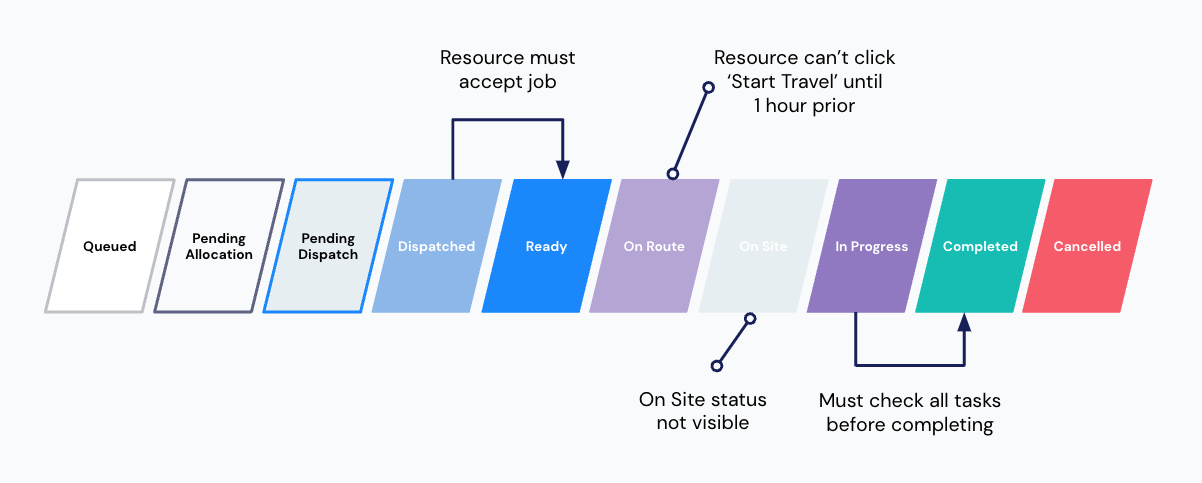
- When a job is dispatched, a deskless worker needs to click the ‘Accept Job’ button to move it into the ‘Ready’ status. They can no decline jobs.
- The ‘On Site’ status is hidden from the Web app and Mobile app.
- Deskless workers can not click the ‘Start Travel’ button until 1 hour before the job scheduled start time.
- Deskless workers can not cancel jobs, they must notify the scheduling team.
- All tasks must be completed prior to completing the work.
To test this example, configure the workflow settings to match the items listed below;
| On | Resources need to accept or decline dispatched job allocations |
| Off | Allow resources to decline allocated jobs |
| Off | When jobs are declined, prompt resources to submit a reason for declining the jobs |
| Off | Allow resources to cancel allocated jobs |
| Off | Consider tasks to be optional |
| Off | Disable En Route status |
| On | Disable On Site status |
| On | Prevent resources from starting jobs early |
Example #3 – Quick workflow with control
The following example is very similar to the previous one shared above, but we are just speeding up the process and reducing the number of statuses the deskless workers need to go through. In this scenario, we encourage customers to consider the reason for not using the ‘Dispatched’ and ‘En Route’ status and any impact it might have. For example, if you send work straight to the ready status how will you know if a deskless worker has seen the job? If you remove the ‘En Route’ status is travel time included in their actual times?
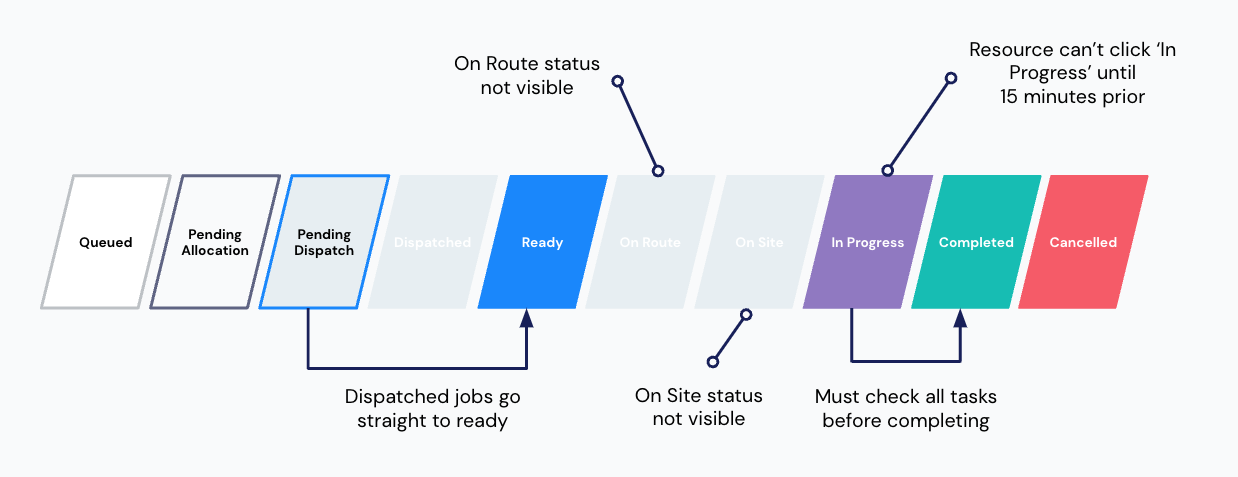
- When a job is dispatched it will go straight into the ready status. Deskless workers do not need to accept the job.
- The ‘On Route’ and ‘On Site’ status is hidden from the Web and Mobile app.
- Deskless workers can not click the ‘In Progress’ button until 15 minutes before the job scheduled start time.
- Deskless workers can not cancel jobs, they must notify the scheduling team.
- All tasks must be completed prior to completing the work.
To test this example, configure the workflow settings to match the items listed below;
| Off | Resources need to accept or decline dispatched job allocations |
| Off | Allow resources to decline allocated jobs |
| Off | When jobs are declined, prompt resources to submit a reason for declining the jobs |
| Off | Allow resources to cancel allocated jobs |
| Off | Consider tasks to be optional |
| On | Disable En Route status |
| On | Disable On Site status |
| On | Prevent resources from starting jobs early |
Guidelines and considerations
Workflow settings are global
It is important to note that the workflow settings are global and will apply to all job types within your solution. This is especially important if you are using Skedulo across multiple business areas as the settings applied here will effect everyone. If you are scheduling for multiple types of services or business areas, we advise you talk through the options with all stakeholders across the company.
Making tasks required applies to all tasks
Making tasks required is a global setting and will apply to every job that is scheduled. Some customers find they need some jobs tasks as optional. If you require more in-depth task management, you can talk to our Customer Experience team to explore the possibility of creating a Custom Mobile Form.
Allow for travel time if preventing resources from starting jobs early
When the setting ‘Prevent resources from starting jobs early’ is on, the next status button will be greyed out until ‘X’ amount of time has been reached, before the scheduled start date/time. If the setting ‘Disable En Route status’ is off, this means their next button will be the ‘Start Travel’ button to update the job to the ‘En Route’ status. If you do not give enough time, the resource will not be able to accurately update the status until the threshold has been reached.
Work offers can be used if you’re unsure about declining work
We find that sometimes customers can get stuck on whether or not they want to allow deskless workers to decline jobs. This conversation normally leads into the exploration of work offers, which allows schedulers to offer work with the ability for the deskless worker to accept or decline. If you are unsure about allowing deskless workers to decline work, we advise you consider work offers before making a decision.
Explore business processes to communicate changes
Throughout the workflow, various exceptions can occur which may require the job to be updated or cancelled. If you are going for a more controlled approach it’s important to consider how deskless workers will communicate with schedulers. Companies typically have established processes when it comes to notifying the scheduling team and it is advised to include this in your end user training. If you would like to explore how Skedulo can help, take a look at our Dynamic Messaging capabilities.
Resources
- Admin Settings: Jobs – Skedulo Knowledge Base